Abstract: In order to control Arduino's random sleep and wake-up, instead of the "predetermined sleep-random wake-up" regular design pattern, the Arduino is randomly put into sleep by an external interrupt, and the Arduino is randomly awakened by the same external interrupt. First, the ArduinoPro Mini was experimented with the open source Enerlib and LowPower libraries, and then applied to the actual engineering design, and achieved good results. This method can be extended to the practical application of engineering design as a mature solution.
This article refers to the address: http://
introduction
"Scheduled sleep-random wake-up" is a common method in embedded system design. For example, after completing the specified data transmission or reception task, the MCU immediately goes to sleep to save power, which is the meaning of "predetermined sleep"; when there are new data transmission and reception tasks, the MCU is awakened in various ways to perform the aforementioned tasks. This is the meaning of "random wake-up". In the actual project, the main function is to use the software. Firstly, the system function is integrated. After the function module is executed, the predetermined sleep instruction is executed immediately, and the wake-up function is directly reflected in the interrupt service program. This method is also widely introduced in many textbooks and forums. This method can meet the needs of general engineering design. However, "predetermined sleep" is not suitable for use in some projects. For example, in a system composed of a wireless sensor network, the sleep timing of a node or subsystem is not determined by itself, but remotely controlled. In this case, the sleep instruction occurs randomly during the execution of its own task by the node or subsystem. Similarly, the wake-up command is also issued randomly, usually to save system hardware costs and improve its reliability, and to issue sleep and wake-up instructions. The same signal, so the system software sleep command can not be fixed in the predetermined position of the system function program, or even in the function main program and its called function.
1 Current Arduino sleep and wake up methods
The tools for controlling Arduino sleep in the Arduino IDE mainly include Enerlib and LowPower open source libraries. The former one has been included in the Arduino open source library. These two kinds of libraries specifically complete the Arduino sleep control. The sleep effects and typical applications of Arduino are described in detail in the references, but they do not address the method of randomized sleep.
1.1 Implementation of the Enerlib class library
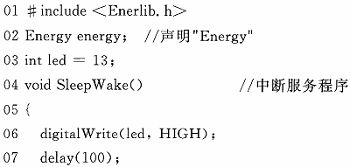
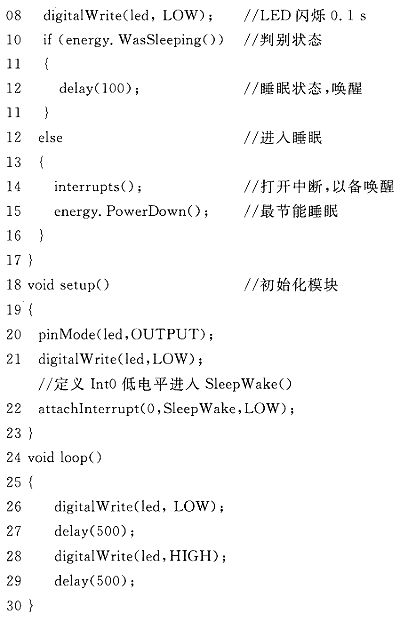
The Example code provided by the Enerlib class library shows how to use the function functions of the class library. For the convenience of reading, I added the line number identifier and Chinese comment, as listed below:
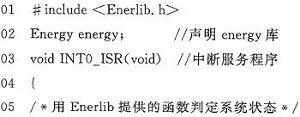
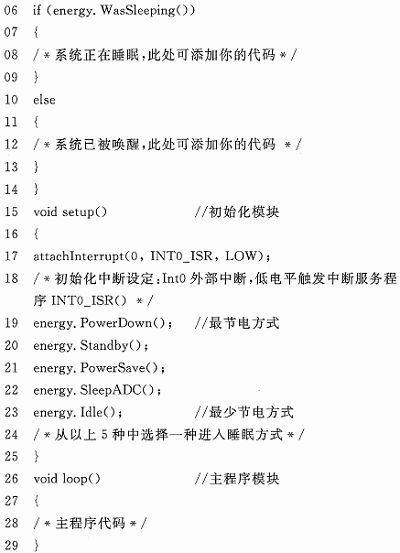
It can be seen that the code that enters sleep is in the initialization module void setup() that is executed only once, indicating that the system enters sleep after completing the initialization work after the system is started. Lines 19 to 23 of the code give five sleep modes, and a suitable method can be selected in practical applications. System wake-up In the Int0 external interrupt service routine, the Enerlib class library provides a WasSleeping() function that can only be used in the interrupt service routine to determine the current "sleep/wake" state of the system. The program performs a sleep. Then, after random wake-up, you cannot enter sleep again. This is an example of a typical "scheduled sleep-random wake".
1.2 Implementation method using LowPower class library
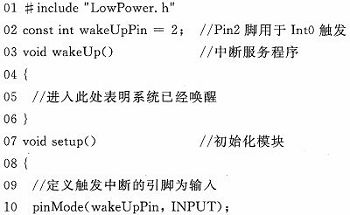
The example code provided by the LowPower class library is as follows (the line number and Chinese comment are added by the author):
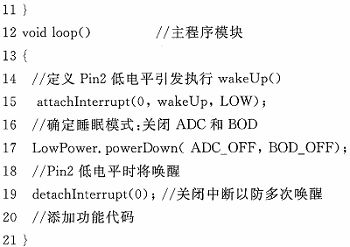
It can be seen that the code that enters sleep is in the main loop body (void loop), and the system enters the sleep state after the system starts. Once there is an external interrupt, it wakes up, wakes up and executes the main program function and then goes to sleep again. This is also typical. Example of "Scheduled Sleep - Random Wake".
Since the ATMega MCU ignores the data direction causing the interrupt pin in the external interrupt mode, the 10th line of the routine "pinMode(wake UpPin, INPUT);" is not necessary.
Both of the above sleep and wake-up examples do not achieve the functional requirements of random entry into sleep.
2 Random sleep and wake up methods
If it can be achieved at any time during the working process of the system to stop working and go to sleep (such as remote control to stop the monitoring of the node in order to save power), and then wake up the system to continue working at the appropriate time, it is a typical "random sleep"
Sleep-random wake-up feature.
2.1 Random access to sleep and wake up methods
In the above two examples, one puts the sleep instruction in the initialization module to realize one-time active sleep; the other is to put the sleep instruction in the main program loop body, and actively enters sleep after performing the predetermined function, both of which are active. There is an external random wake up. If you want to achieve random sleep through external instructions (interrupts), the sleep instruction can't be placed in the initialization module void setup() first, because it only causes one sleep; if it is placed in the main program loop body void loop(), it must Placing the corresponding flag in the interrupt service routine caused by the "sleep/wake" command, and then judging the flag in the main program, will inevitably increase the corresponding software expenditure, and the structure of the program is not clear.
Therefore, the easiest way to achieve random sleep is to put the sleep instruction directly into the interrupt service routine. When the sleep command is issued, the interrupt service routine is executed to sleep; when the wake-up command is issued, it is only necessary to enter the interrupt service routine. wake. However, in the same interrupt service program to achieve this function, you need to thoroughly understand the interrupt processing mechanism of the corresponding microcontroller and the library function used to handle the interrupt.
2.2 Arduino external interrupt
The core processor that constitutes Arduino is mainly Atmel's AVR ATmega series MCU (such as ATmega328). The commonly used experimental platforms are UNO, NANO, Pro, Pro Mini, Micro, Lilypad, Leonardo, Duemilanove, etc., so Arduino's sleep and wake-up control The essence is the control of the MCU, which is to control ATnaega328 sleep and wake up.
The experimental platform for random sleep and wake-up is Arduino Pro Mini 3.3 V, 8 MHz/ATInega 328. The external interrupt mechanism of ATrnega328 mainly includes: 1RESET has the highest priority, the second is INT0; 2 global interrupt occurs when any interrupt occurs The enable bit is cleared to disable all other interrupts; 3 after exiting the interrupt, always return to the main program and execute at least one instruction to execute other pending interrupts; 4 if edge trigger mode is selected or The level change trigger mode, then the pulse with duration longer than one clock cycle will trigger the interrupt, and the too short pulse will not guarantee the trigger interrupt. If the low level trigger mode is selected, the low level must be maintained until the current instruction is executed; 5 The external interrupt is triggered by pins INT0, INT1 and INT2. As long as the interrupt is enabled and the level changes appropriately, the interrupt will be triggered even if the pin INT0~2 is configured as an output. 6If INT0 and INT1 are required to be on the falling edge of the signal Or the rising edge trigger, the I/O clock must work; 7 trigger the interrupt through the level mode, and ensure the level when the MCU wakes up from the power down mode. Hold a certain period of time to reduce the sensitivity of the MCU to noise; 8 interrupt response time is at least 4 clock cycles. If the MCU is in sleep mode when the interrupt occurs, the interrupt response time needs to be increased by 4 clock cycles. The startup time required for different sleep modes.
2.3 Enerlib and LowPower class library interrupt handling
Among the two libraries, Enerlib's five sleep commands are PowerDown(), Standby(), PowerSave(), SleepADC(), and Idle(). The five sleep modes of LowPower are ADC_OFF, BOD_OFF, IDLE_OFF, and STANDBY EXT_STANDBY. In addition to shutting down various devices, the system interrupts are handled in the same way, that is, the interrupt enable is not processed before and after sleep, and functions that enable and disable the terminal are provided. In this way, the timing of opening and closing the interrupt is completely left to the developer.
3 Random sleep and wake-up realization and results
Use the Arduino's own LED (Pin13 drive) to check random sleep and wake-up. When the sleep occurs, the LED flashes for 0.1 s, indicating that the sleep command is received, then the LED is turned off to sleep; the LED flashes for 0.1 s when the wake-up occurs, indicating that the wake-up command is received. Then the LED flashes at 1 Hz. The following code adds the line number identifier and Chinese comment.
Connect the Pin2 (D2) of the Arduino Pro Mini to Vcc through a 10 KΩ resistor, then connect a push button switch to the ground in Pin2. After downloading the program, power on, the system LED enters the 1 Hz flash mode, press the button, the LED flashes. 0.1 s, then go to sleep; press the button again, the LED flashes for 0.1 s, then the system LED enters the 1 Hz flash mode, and so on.
Conclusion
The core of Arduino--ATmega series MCUs are designed with the reliability of RISC's reliable structure, main control board and peripheral modules, and have high reliability. Arduino is popular all over the world. In addition to open source hardware, more importantly, it is equipped with IDE for developing software and numerous class libraries. At the same time, IDE integrates and defines programming methods. The underlying bootloader is like a micro operating system, not As with Keil C to develop microcontroller software to organize the structure of the program, write the driver, Arduino's software and hardware design makes programming, power supply, download integration. Because it follows the purpose of open source sharing, related libraries will become more and more abundant. It is this IDE that isolates software development tools from actual hardware, making software development simple and fast, and developers can focus on the implementation of the solution. Of course, due to the isolation of the underlying software and the functional module hardware, developers are increasingly relying on the class library. This cycle causes the developer to rely too much on the class library without exploring the essence of the problem, and finally the problem is not solved or retreated. Replacing the main control system hardware has hampered the wider range of applications for the Arduino. The routines described in this paper can be directly applied according to the actual engineering requirements and have certain reference value.
Sanitation dispenser,it can automatically receive the signal to turn on the switch to the machine when the person reaches out the hand, so that the work sprays disinfectant or foam.
There are two working modes: automatic setting time and random time. It can be placed in toilets, kitchens, office buildings, hospitals, banks and other places.Suitable for a variety of viscous liquids, such as hand soap, detergent, disinfectant, sunscreen, etc. It can be placed in toilets, kitchens, office buildings, hospitals, banks and other places.

Sanitizer Dispenser,Hand Sterilizer Dispenser,Wall Mounted Hand Sanitizer,Automatic Hand Sanitizer Dispenser
Taishan Jie Da Electrical Co., Ltd , https://www.ts-jieda.com