Adb's full name is AndroidDebugBridge, translated into android debug bridge, which is the role of debugging bridge in the android system. Through adb we can easily debug Android programs through DDMS in Eclipse. To put it plainly, it is the debug tool.
Adb is a client-server program, where the client is the computer you use to operate, and the server is the android device.
The following describes in detail how to use adb.
Enable adb debugging on your deviceTo use adb on a device connected via USB, you must enable USBdebugging (under DevelopropTIons) in the device system settings.
On devices running Android 4.2 and higher, the DevelopropTIons screen is hidden by default. To display it, go to SetTIngs Aboutphone and tap Buildnumber seven times. Go back to the previous screen and find DevelloperopTIons at the bottom.
On some devices, the location or naming of the Developeroptions screen may vary.
Now you can connect your device to USB. You can verify that the device is connected by executing adbdevices from the android_sdk/platform-tools/ directory. If connected, you will see the device name listed as "device".
Note: When you connect to a device running Android 4.2.2 or higher, a dialog will appear asking if you accept the RSA key that is allowed to be debugged on this computer. This security mechanism protects the user device because it ensures that USB debugging and other ADB commands can only be performed if you can unlock the device and confirm the dialog.
For more information on connecting to devices via USB, see Running apps on hardware devices.
Connect to device via WLANIn general, adb is used via USB. However, you can also use it via WLAN as described below.
Connect your Android device and adb host computer to a common WLAN network that both can access. Note that not all access points are available; you may need to use an access point that has the firewall configured properly to support adb's access point.
Note: If you are trying to connect to an AndroidWear device, force it to connect to the WLAN by turning off Bluetooth for the phone it is connected to.
Connect the device to the host computer using a USB cable.
Set the target device to listen for TCP/IP connections on port 5555.
$adbtcpip5555
Disconnect the USB cable from the target device.
Find the IP address of your Android device. For example, on a Nexus device, you can find the IP address by accessing Settings >Abouttablet (or Aboutphone) Status IPaddress. Or, on the AndroidWear device, you can find the IP address by visiting the Settings Wi-FiSettings Advanced IP address.
Connect to the device and identify the device by its IP address.
$adbconnectdevice_ip_address
Please confirm that your host computer is connected to the target device:
$adbdevices
Listofdevicesattached
Device_ip_address:5555device
Now you can get started!
If the adb connection is lost:
Make sure your host is still connected to the same Wi-Fi network as your Android device.
Reconnect by performing the adbconnect step again.
If you are unable to connect, reset the adb host:
Adbkill-server
Then, start from the beginning.
Query deviceIt is helpful to know which simulator/device instances are connected to the adb server before issuing the adb command. You can use the devices command to generate a list of connected emulators/devices:
Adbdevices
In response, adb outputs this status information for each instance:
Serial Number—A string created by adb that uniquely identifies an emulator/device instance through its console port number. The format of the serial number is type-console-port. Below is an example of a serial number: emulator-5554
Status—The connection status of an instance can be one of the following:
offline—The instance is not connected to adb or does not respond.
Device—The instance is now connected to the adb server. Note that this state does not mean that the Android system is fully up and running, because the system is still starting when this instance connects to adb. However, after startup, this will be the normal operating state of the simulator/device instance.
nodevice—The simulator/device is not connected.
The format of the output is similar to the following:
Listofdevicesattached
Serial_numberstate
The following example shows you the devices command and its output:
Adbdevices
Listofdevicesattached
Emulator-5554device
Emulator-5556device
Emulator-5558device
Send commands to a specific deviceIf multiple simulator/device instances are running, you must specify a target instance when issuing the adb command. To do this, use the -s option in the command. The following is the usage of the -s option:
Adb-sserial_numbercommand
As shown above, you specify the target instance for the command using the serial number assigned by adb. You can use the devices command to get the serial number of the running simulator/device instance. E.g:
Adb-semulator-5556installhelloWorld.apk
Note that if you issue a command without specifying a target emulator/device instance when multiple devices are available, adb will generate an error.
If you have multiple devices available (hardware or emulated devices), but only one device is an emulator, use the -e option to send commands to the emulator. Similarly, if you have multiple devices but only one hardware device is connected, use the -d option to send commands to the hardware device.
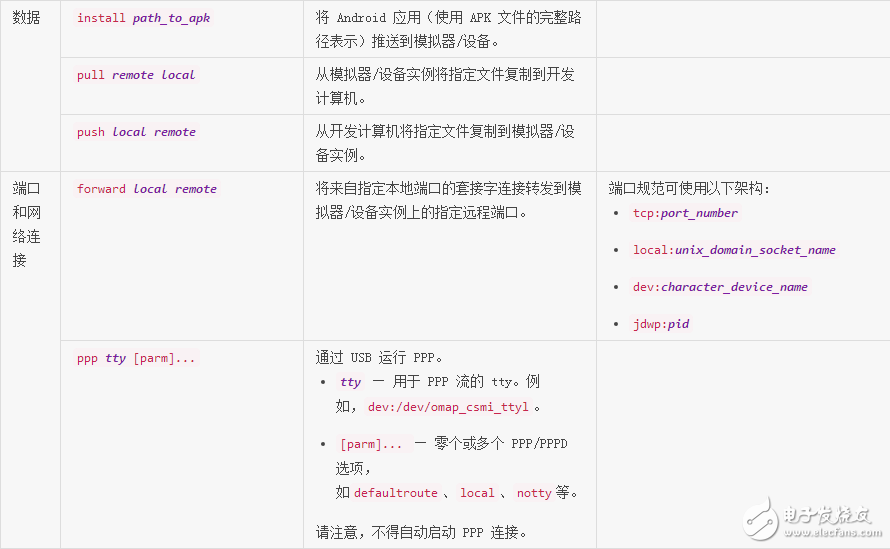
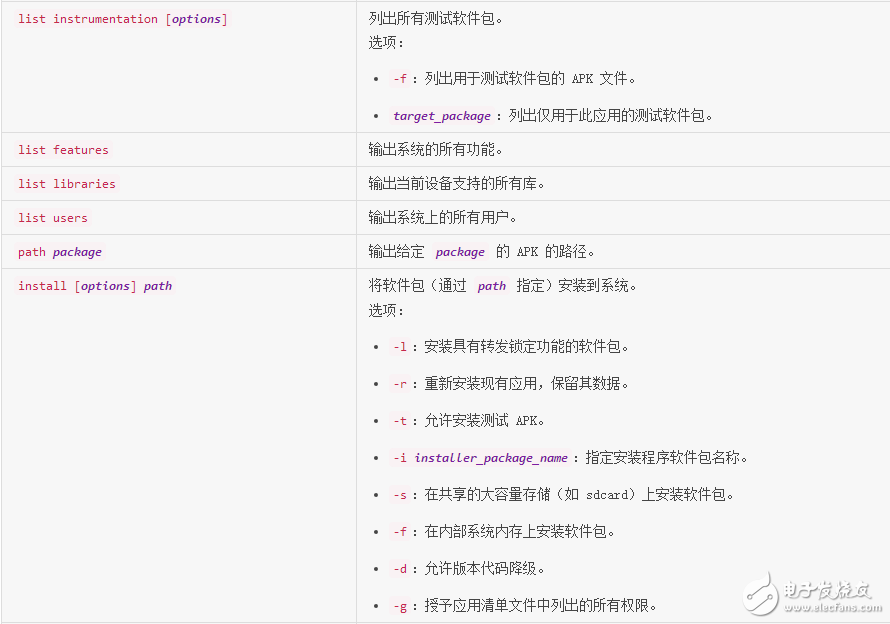
Install the appYou can use adb to copy an app from a development computer and install it on an emulator/device instance. To do this, use the install command. With this command, you must specify the path to the APK file you want to install:
Adbinstallpath_to_apk
For more information on how to create an APK file that can be installed on an emulator/device instance, see Building and running your app.
Please note that if you use AndroidStudio, you don't need to install your app on the emulator/device directly using adb (or aapt). Instead, Android Studio handles the packaging and installation of your app for you.
Set port forwardingYou can use the forward command to set up any port forwarding—forwarding requests for a specific host port to other ports on the emulator/device instance. Here's how to set up forwarding for host port 6100 to emulator/device port 7100:
Adbforwardtcp:6100tcp:7100
You can also use adb to transfer the forwarding to the specified abstract UNIX domain socket as follows:
Adbforwardtcp:6100local:logd
Copy files to/from deviceYou can use the adb command pull and push to copy files to or copy files from the emulator/device instance. Unlike the install command (which copies only APK files to specific locations), the pull and push commands allow you to copy arbitrary directories and files to any location in the emulator/device instance.
To copy a file or directory (and its subdirectories) from the emulator or device, use
Adbpullremotelocal
To copy a file or directory (and its subdirectories) to the emulator or device, use
Adbpushlocalremote
In the above command, local and remote refer to the path of the target file/directory on the development computer (local) and the emulator/device instance (remote). E.g:
Adbpushfoo.txt/sdcard/foo.txt
Stop the adb serverIn some cases, you may need to terminate the adb server process and then restart it to resolve the issue (for example, if adb does not respond to commands).
To stop the adb server, use the adbkill-server command. You can then restart the server by issuing any other adb command.
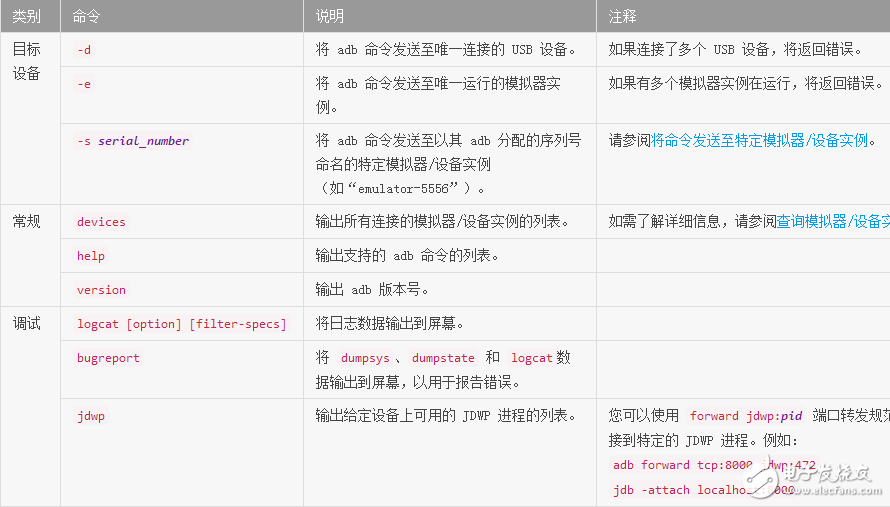
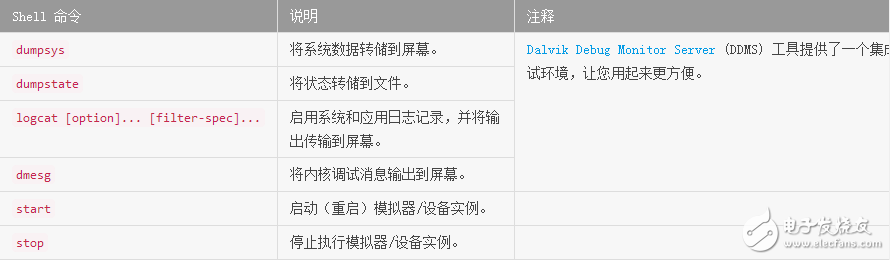
Adb command referenceYou can issue an adb command from the command line on the development machine or via a script. The usage is as follows:
Adb[-d|-e|-sserial_number]command
If only one emulator is running or only one device is connected, the adb command is sent to the device by default. If more than one simulator is running and/or connected to multiple devices, you need to specify the target device to which the command should be sent using the -d, -e, or -s option.
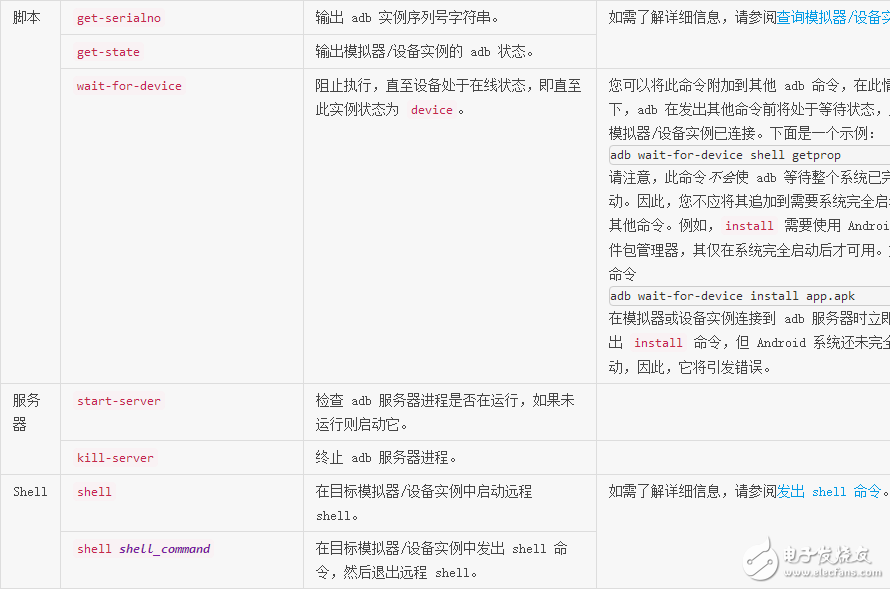
You can use shell commands to issue device commands via adb, with or without access to the adb remote shell on the emulator/device instance. To issue a command without entering the remote shell, use the following shell command:
Adb[-d|-e|-sserial_number]shellshell_command
Alternatively, use the following command to enter the remote shell on the emulator/device instance:
Adb[-d|-e|-sserial_number]shell
When you are ready to exit the remote shell, press Control+D or type exit.
The shell command binary is stored in the file system of the emulator or device with the path /system/bin/.
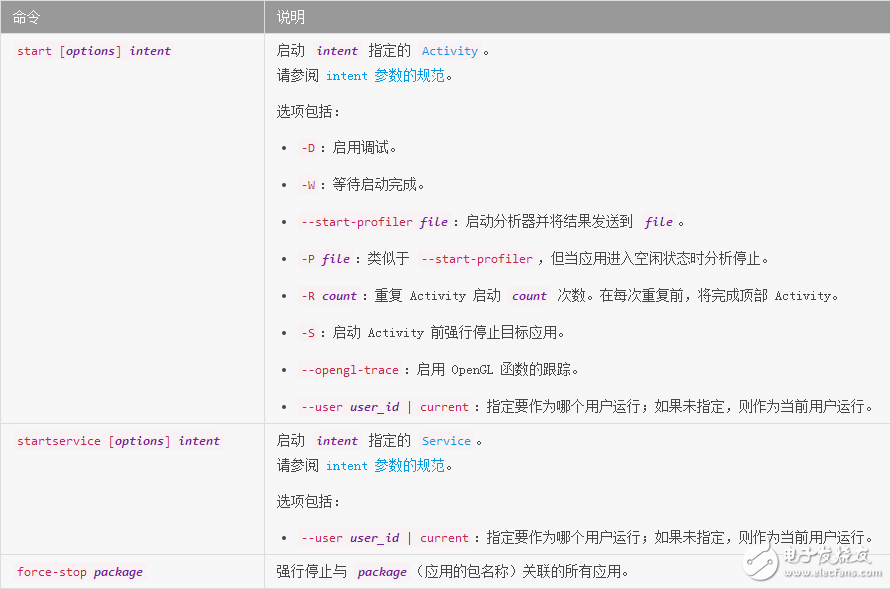
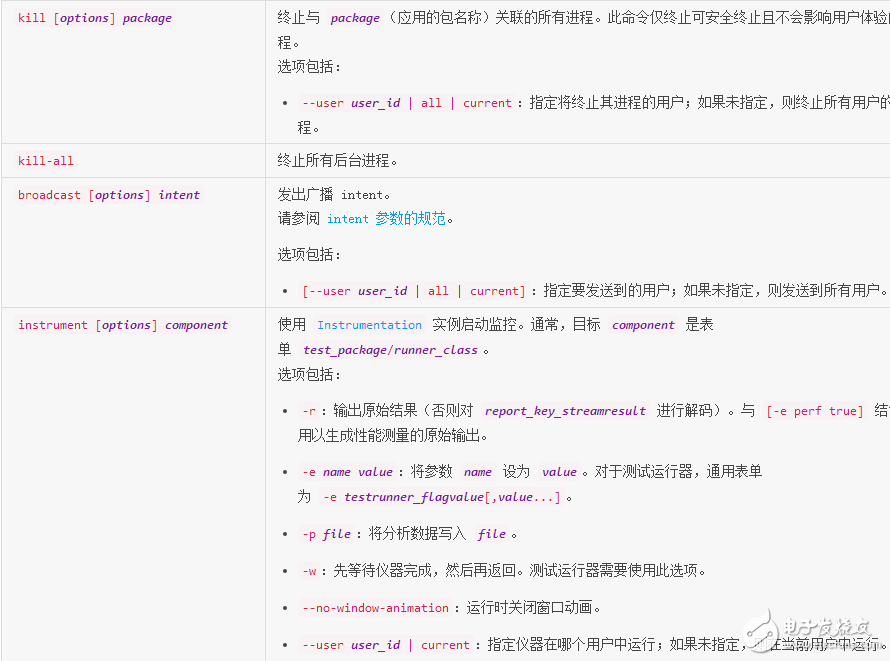
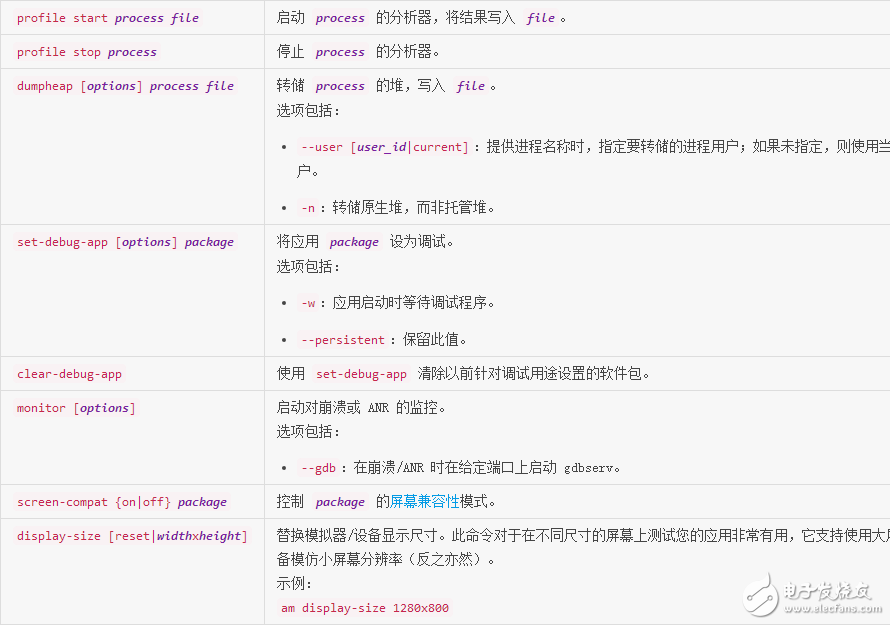
Call ActivityManager(am)In adbshell, you can use the ActivityManager (am) tool to issue commands to perform various system operations, such as starting an activity, forcibly stopping a process, broadcasting an intent, modifying device screen properties, and other operations. In the shell, this syntax is:
Amcommand
You can also issue ActivityManager commands directly from adb without having to go into the remote shell. E.g:
adbshellamstart-aandroid.intent.action.VIEW

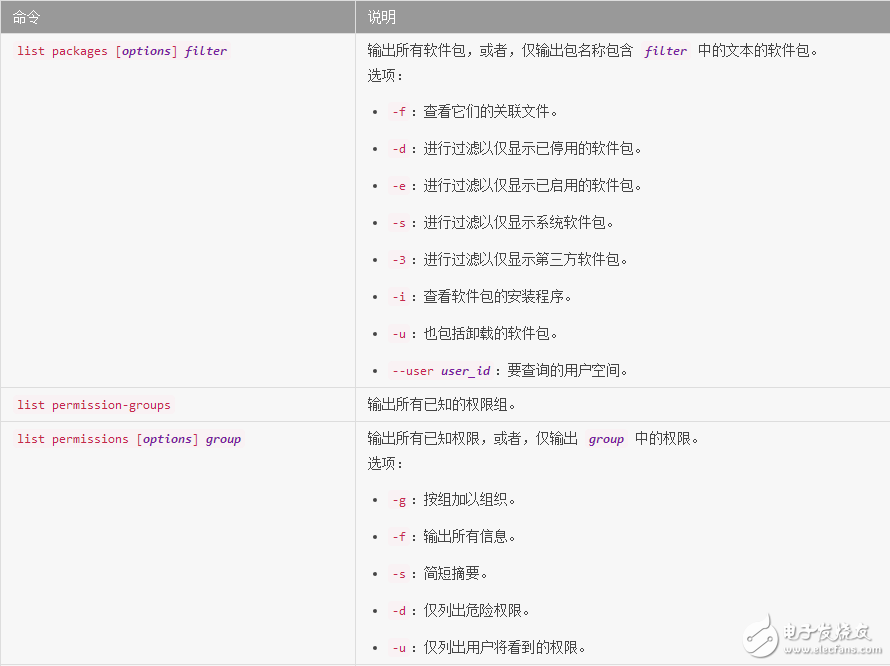
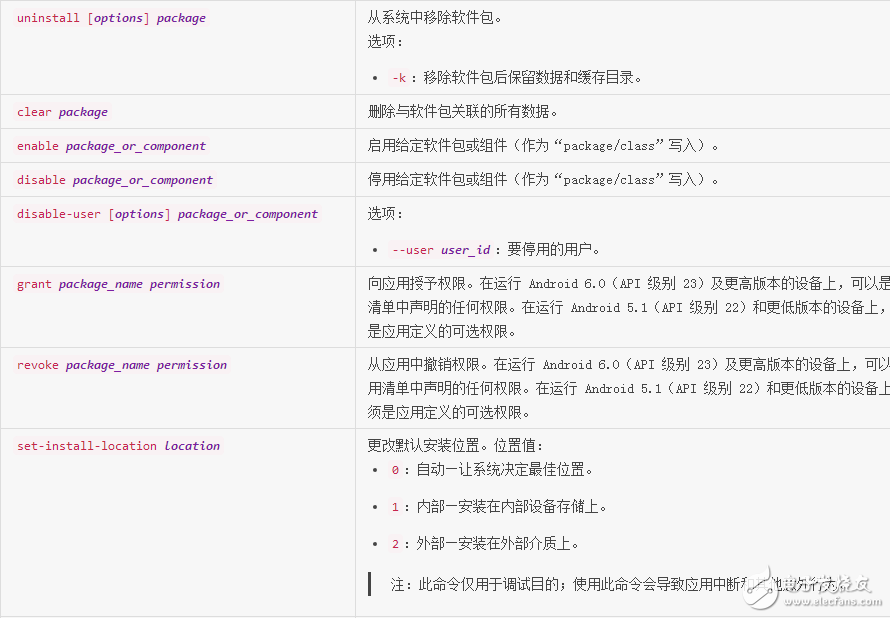
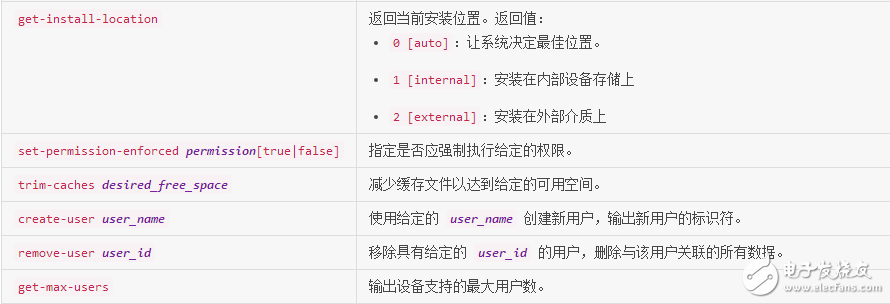
In adbshell, you can use the Package Manager (pm) tool to issue commands to manipulate and query application packages installed on your device. In the shell, this syntax is:
Pmcommand
You can also issue package manager commands directly from adb without having to go into the remote shell. E.g:
adbshellpmuninstallcom.example.MyApp
The screencap command is a shell utility for taking screenshots of the device display. In the shell, this syntax is:
Screencapfilename
To use screencap from the command line, enter the following command:
$adbshellscreencap/sdcard/screen.png
The following screenshot session example shows you using adbshell to capture a screenshot and download it from your device using the pull command:
$adbshell
Shell@$screencap/sdcard/screen.png
Shell@$exit
$adbpull/sdcard/screen.png
Record videoThe screenrecord command is a shell utility for recording devices (running Android 4.4 (API level 19) and higher). This utility records the screen activity to an MPEG-4 file.
Note: Audio is not recorded with the video file.
Developers can use this file to create promotional videos or training videos. In the shell, this syntax is:
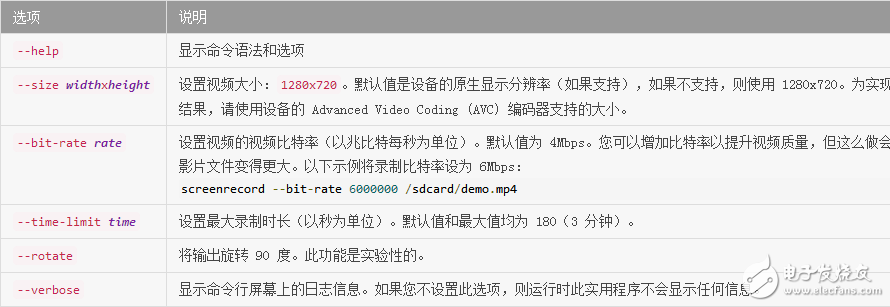
Screenrecord[options]filename
To use screenrecord from the command line, enter the following command:
$adbshellscreenrecord/sdcard/demo.mp4
Press Control+C to stop the screen recording. Otherwise, the recording will stop automatically when the time limit set by three minutes or --time-limit is reached.
To start recording the device screen, run the screenrecord command to record the video. Then, run the pull command to download this video from the device to the host computer. The following is an example of a recording session:
$adbshell
Shell@$screenrecord--verbose/sdcard/demo.mp4
(pressControl+Ctostop)
Shell@$exit
$adbpull/sdcard/demo.mp4
The screenrecord utility can record at any supported resolution and at the desired bit rate while preserving the aspect ratio of the device display. By default, this utility records in native display resolution and screen orientation for a maximum of three minutes.
Here are some of the known limitations of the screenrecord utility, which you should be aware of when using:
Some devices may not be able to record at their native display resolution. If you have problems recording your screen, try using a lower screen resolution.
Rotating the screen while recording is not supported. If the screen is rotated during recording, the recording of part of the screen will be cut off.
Starting with Android 7.0 (API level 24), Android Runtime (ART) collects the execution configuration files of installed applications, which can be used to optimize application performance. You might want to check the collected configuration files to see which methods and which classes to use frequently during the application launch.
To generate a text form of profile information, use the following command:
$adbshellcmdpackagedump-profilespackage
To retrieve the generated file, use:
$adbpull/data/misc/profman/package.txt
Other shell commandsFor a list of all available shell programs, use the following command:
Adbshellls/system/bin
Most commands provide help instructions.
ZGAR Vape Disposable Pods
ZGAR electronic cigarette uses high-tech R&D, food grade disposable pod device and high-quality raw material. All package designs are Original IP. Our designer team is from Hong Kong. We have very high requirements for product quality, flavors taste and packaging design. The E-liquid is imported, materials are food grade, and assembly plant is medical-grade dust-free workshops.
From production to packaging, the whole system of tracking, efficient and orderly process, achieving daily efficient output. WEIKA pays attention to the details of each process control. The first class dust-free production workshop has passed the GMP food and drug production standard certification, ensuring quality and safety. We choose the products with a traceability system, which can not only effectively track and trace all kinds of data, but also ensure good product quality.
We offer best price, high quality Pods, Pods Touch Screen, Empty Pod System, Pod Vape, Disposable Pod device, E-cigar, Vape Pods to all over the world.
Much Better Vaping Experience!
ZGAR Neo Vape Pods, ZGAR Disposable Vape, ZGAR Vape Pods System Vape,ZGAR Vape Pods Disposable Pod Vape Systems
Zgar International (M) SDN BHD , https://www.zgarpods.com